Gallery Handbook
School of Art and Design Gallery Handbook
This handbook is also available for download as a PDF here : SoAD_GalleryHandbook2022
The School of Art and Design offers two formal gallery spaces and a variety of ad hoc spaces for student and faculty use. Please read through this document to understand the limitations, requirements, and expectations for using one of the School’s exhibition spaces.
The Wellington B. Gray and Burroughs Wellcome galleries are available for BFA Senior and MFA Thesis exhibitions. The Burroughs Wellcome Gallery may also be scheduled for other types of shows. Ad hoc spaces located through Jenkins Fine Arts Center are also available for exhibitions.
We look forward to supporting your exhibition and providing a positive, professional experience.
Kate Bukoski, Director, School of Art and Design / bukoskik16@ecu.edu / 252-328-5180
Maria Modlin, Preparator, Wellington B. Gray Gallery, modlinm@ecu.edu or graygallery@ecu.edu / 252-328-2601
Community Expectations
The gallery spaces in Jenkins Fine Arts Center are used by many students, faculty, and community members to support the work and mission of our School. Oftentimes exhibitions have quick turnaround times. As a member of this community, adhering to the schedule, policies, and procedures for your exhibition is paramount to ensuring both the success of your exhibition as well as the success of exhibitions scheduled after yours in the gallery. The galleries are used regularly to meet a variety of installation needs. Ensuring that you follow our community expectations and the guidelines in this manual are critical.
It is common for people to feel anxiety and stress when preparing for and mounting an exhibition, especially senior and thesis shows that are the culmination of years of hard work. The School’s staff is here to support your learning and work as you mount your exhibition. This process involves engaging with School staff (Director, Main Office Staff, Gallery Preparator), faculty, fellow students, and community members.
Engagement in this process requires honesty, space for making mistakes, and discussion for all involved. The School’s staff will do its best to facilitate a safe and supportive environment for your exhibition, one where everyone has the space to learn, grow, and excel. As an exhibitor, we need your help in making this a reality. As a member of this community, you take responsibility for your own actions and acknowledge their impact upon others, especially other students exhibiting in the gallery at the same time and those exhibiting in the gallery after you.
Adhering to these community expectations requires dedication on all our parts, and we are excited to support you through this important step in your education.
Commitment to Freedom of Expression
The School is committed to supporting freedom of expression and adheres to the University’s policy on Freedom of Expression.
General Guidelines
These guidelines apply to all exhibition spaces within Jenkins Fine Arts Center.
- Follow the schedules, policies, and procedures provided by the Gallery and School staff for installation, opening, receptions, and deinstallation. Complete the Deinstall Checklist (at the end of this document) and turn it in to Gallery staff when you are finished deinstalling. Return tools and supplies to their original location after use. If you are unsure of where things go, please ask. Leave the Gallery space in the condition you found it or cleaner so that students following you are not impacted.
- Keep lines of communication open and flowing with:
- Faculty to ensure that you are meeting expectations for your work and review.
- Gallery and School staff to ensure you understand deadlines, expectations, and policies. If something seems broken or damaged, tell staff or email graygallery@ecu.edu as soon as possible. If you have questions, please ask. We will never shame or penalize anyone for asking a question!
- Fellow students showing in th e gallery with you and/or after you.
For accessibility, all pathways should be 40” or wider. Do not block entrances/exits to galleries. Put all unused or reusable tools and hardware back in the Gallery prep room in their appropriate place. Others rely on being able to find the tools. Installation, deinstallation, and receptions generate mess and trash. Exhibitors are expected to remove trash and debris and clean any spills or messes after installation, deinstallation, and the reception.
- Recycling is placed in bins outside the galleries.
- Cleaning should be prompt and timely to minimize impact on other students.
- Housekeeping staff are not responsible for cleaning up gallery spaces.
Projects that involve fire, glitter, live animals, or bodily fluids are not allowed in the galleries. Speak with Gallery or School staff for more information or clarification. If your project has the potential to be excessively destructive, messy, noisy, or in any way dangerous, you must consult with Gallery and School staff at least ONE MONTH prior to setting up your exhibition. It is unlikely these types of projects can be accommodated, however we are open to discussing ideas and options to arrive as a solution that will work for all involved. If you are doing anything that seems outside the norm in the gallery, please meet with staff . We focus on being accommodation, however we need adequate time to plan.
Exhibitors may request to paint walls in the Burroughs Wellcome or Gray Gallery a special color for their exhibition. Requests must be made at least one month prior to the exhibition’s opening to Gallery staff. Gallery and School staff reserve the right to deny requests to paint walls based on exhibitions schedules, the color selected (dark colors are difficult to repaint), or other criteria. If students are permitted to paint wall(s), they are responsible for the cost, time, and labor necessary to return the wall(s) to their original color and condition.
Alcohol is not allowed during student exhibition receptions. Please speak with the Director if you have further questions or wish to request an exemption.
Loan Agreements and Insurance
Art shown in the galleries is insured with a $2,500 deductible. All work must have a valid Loan Agreement on file to make an insurance claim. Loan agreements are completed online via this link. Loan agreements must to be filled out prior to installing your exhibition.
Selling Work
You are free to sell work in your exhibition and during your reception. In the Gray Gallery, please provide Gallery staff with a price list that will be placed in your exhibition. Exhibitors in the Gray Gallery who wish to sell items during their reception will work with Gallery staff to plan the sale.
Exhibitors in the Burroughs Wellcome Gallery provide a price list and contact information for sales in the gallery.
If you wish to sell work during your reception, you are solely responsible for setting up merchandise or work, handling all transactions, and delivering any sold goods to buyers.
All artwork sales are handled directly by the artist and buyer. School staff cannot act as intermediaries in any financial transactions, including accepting payment on exhibitors’ behalf or storing artwork that will be picked up by a buyer.
School of Art and Design Galleries
The School’s galleries are scheduled and programmed by the School’s staff in consultation with faculty, students, and community members. The Gray Gallery’s calendar is set at least one year in advance. The Burroughs Wellcome’s calendar is scheduled on a much shorter timeline, and there are often weeks available for exhibitions in the first half of the fall or spring semesters and over the summer.
MFA Thesis Exhibitions are scheduled in the Gray Gallery at least one year in advance. BFA Senior Exhibitions are scheduled by the end of August for fall semester and the end of January for spring semester. The Director communicates directly with students and faculty to schedule BFA Senior Exhibitions. If you have any questions about this process, please contact the school’s Director, Kate Bukoski.
School of Art and Design Galleries
Wellington B. Gray Gallery
The Gray Gallery is located inside Jenkins Fine Arts Center on the second floor.
The Gallery’s hours are Monday to Friday, 10 am to 5 pm. Weekend or after-hours access to the Gray Gallery for special audiences can be pre-arranged with Gallery staff and is based on staff availability.
The Gallery is staffed while exhibitions are on view, security cameras and an alarm system are installed to deter theft.
Exhibitors may only access the Gray Gallery for installation and deinstallation during scheduled times. After-hours access is not permitted due to security.
Gallery Specifications
- Vitrines
- Pedestals
- Nothing may be hung from the ceiling
- PR/marketing for each exhibition provided by the Gallery
- Exhibitions will be held in the main area of the Gray Gallery. There may be up to 10 students in the gallery depending on the scope of work.
Receptions in the Gray Gallery
Receptions for group exhibitions are generally held from 5 to 8 pm on a Friday evening during the exhibition. Receptions are schedule by Gallery and School staff, who will notify exhibitors of the day and time of the reception.
Receptions for group exhibitions are catered using a predetermined menu of food and beverages. Exhibitors may provide special foods or items. Please notify Gallery staff if you wish to provide your own food or beverages.
Food and beverage service will follow ECU policies and procedures.
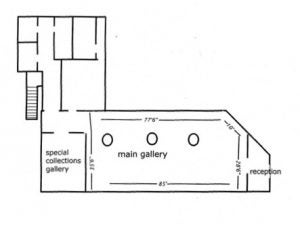
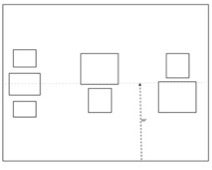
Gray Gallery Layout
Burroughs Wellcome Gallery
The Burroughs Wellcome Gallery is located inside Jenkins Fine Arts Center on the second floor. The Gallery’s hours are Monday to Friday, 8 am to 5 pm, closed during university holidays. The Burroughs Wellcome Gallery is opened and closed daily by Main Office staff.
During installation and deinstallation, exhibitors will be given a key to the gallery for access. Exhibitors must communicate with Mary Elliott to check out the key to the gallery.
Exhibitors manage weekend or after-hours access to the Burroughs Wellcome Gallery for special showings. Exhibitors who have special showings are responsible for opening and closing the Gallery. Notify Mary Elliott in the Main Office if you have special showings (weekdays after 7 pm, weekends, or during University Holidays) to ensure that the Jenkins Fine Arts Center exterior doors will be unlocked for visitors.
Gallery Specifications
- Vitrines (limited availability)
- Pedestals (limited availability)
- Work may be hung from the ceiling
- Exterior glass cases can be locked
- Exhibitors provide their own PR
Receptions in Burroughs Wellcome Gallery
For exhibitions in the Burroughs Wellcome Gallery, exhibitors are responsible for scheduling their receptions. Most receptions are held for two to three hours in the evening, usually at a window between 5 and 9 pm. Keep in mind that staff and faculty are more likely to be able to attend receptions that are closer to the end of the workday (e.g. 5 pm).
Once you schedule your reception, notify Mary Elliott in the Main Office to ensure that the Jenkins Fine Arts Center exterior doors will be unlocked. You may request tables for receptions from Mary Elliott in the Main Office.
The School provides a predetermined menu of food and beverages. Please communicate with Mary Elliot and Jessica Sutton in the Main Office to request food and beverage for your reception. Receptions must be scheduled at least two weeks in advance. Exhibitors may provide special foods or items. If you wish to provide your own food or beverages, please notify Main Office staff. Food and beverage service will follow ECU policies and procedures.
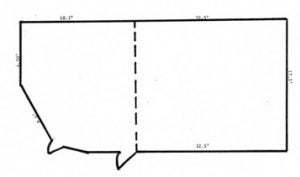
Burroughs Wellcome Gallery Layout
Ad Hoc Exhibition Spaces
Throughout Jenkins Fine Arts Center there are several spaces that may be used to exhibit artwork. These spaces are part of the structure of the building and are situated in shared common spaces. Exhibitions may not impede the flow of traffic or block egress.
Students or faculty wishing to exhibit work in Jenkins Fine Arts Center in any space other than the Gray Gallery or Burroughs Wellcome Gallery must have approval from the Director. When programming ad hoc spaces we are mindful that these are shared spaces where building occupants may not have the choice to avoid artwork. Ad hoc exhibition spaces include but are not limited to:
- The foyer outside the Main Office
- Display cases on the third floor and third floor ramps
- Third floor lounge area
- Wires and hanging ledges located throughout Jenkins in hallways
The same planning, installation, and deinstallation guidelines apply to ad hoc spaces. Supplies and tools for installation can be requested through Gallery or Main Office staff. Exhibitors are expected to deinstall their work and return the space to its previous condition.
Exhibitors may hold receptions for exhibitions in ad hoc spaces but are solely responsible for any catering. Tables may be requested for receptions through Mary Elliott or Jessica Sutton in the Main Office. Tables for receptions may not block doors or impede traffic flow through hallways.
To schedule an exhibition in an ad space please speak with the Director, Kate Bukoski.
Exhibition Planning
Installing an exhibition is an exciting and intense time, where many decisions occur, and questions may arise. To anticipate the full visual effect and challenges of your exhibition, we recommend practicing installing your exhibition and work. Students may reserve time in the Burroughs Wellcome Gallery to practice installation. See the Director to request time in the Burroughs Wellcome Gallery.
A scale model of the gallery is useful in planning the layout of exhibitions. At the minimum, measure artwork and compare it to the gallery’s dimensions to determine where things will be placed.
When planning your exhibition, consider how the architectural context of the gallery will impact how the audience interacts with your work. For example, you might draw attention with a large piece as a starting point. Consider how the distance between artwork and groupings may impact how the work is perceived and the audience’s reactions. Consider how works’ proximity, placement, and sequencing create interactions and meaning or produce a narrative.
Providing seating or singling out a piece or small collection with empty space surrounding it can guide the audience’s attention. Benches are available for exhibitions. Ask Gallery staff for more information and to access the benches.
Consider how signage and text, such as your title or artist statement, will be used and placed (see more below).
When planning pathways through your exhibition, consider that most people will not want to walk through openings narrower than 32” for fear of knocking over the artwork—we recommend a minimum of 40”. The culture surrounding art institutions creates social norms that subtly encourage viewers to be physically cautious and conscious of personal space; tight squeezes that may be completely overlooked in day-to-day life can come off as “off-limits” within art spaces. Plan the layout accordingly if you have an area of freestanding pieces that you would like your audience to interact with or walk through.
Consider if and how you want people to interact with and/or touch your work. How will you communicate this? When in doubt, assume that people will not want to touch your work.
Access to electricity — Outlets
Gray Gallery
There are power outlets across the bottom of the walls. Overhead light canisters may be used as an outlet; however, this requires ECU Facilities staff to install, and the electrical cord will show (drape) from the fixture. The light canister cannot be used as a light if used as an outlet.
Burroughs Wellcome Gallery
Power outlets are located across the bottom of the walls.
Freestanding Work
The Gallery has several pedestals available for exhibitions. Pedestals vary in size, shape, and condition. For more information about available sizes and shapes of pedestals, please meet with Gallery staff as early as possible. Note that most pedestals will require repainting to make them presentable. Students are responsible for repainting pedestals, which may take days for paint coats to dry. Pedestal paint is semi-gloss bright white. Always use drop cloths when painting. Rolls of craft paper are available from Gallery staff to use as drop cloths.
Students in group exhibitions must communicate with fellow students to facilitate sharing available pedestals.
If students choose to fabricate pedestals, prepare and plan well in advance and work closely with the Wood Shop staff. Wood Shop and Gallery staff will not fabricate pedestals for students but will assist students in learning new equipment or fabrication techniques.
Hanging Work From Ceilings
Concrete portions (the back portion) of the Burroughs Wellcome Gallery ceiling are suitable to suspend larger or heavier pieces.
Heavy pieces cannot be hung in the Gray Gallery. Any need to hang work from the ceiling in the Gray Gallery must be discussed with Gallery staff to determine if the plan is feasible given the limitations of the Gallery’s ceiling and lighting system.
Staging
When installing, place work in the gallery along the floor on bubble wrap or foam to protect the work. Foam pads are available from the Gray Gallery; ask Gallery staff for access to these materials.
Preparing your work for hanging
When you walk into the gallery to install your work, you want to be prepared and sure your artwork is ready for hanging. Prior to installation measure your work and complete hanging calculations using the Hanging Hardware Formula (see below).
Write hanging information on sticky notes or painters tape attached to the back of the work, or on a separate piece of paper. If another piece of artwork will be displayed on the same wall this approach will aid in aligning the artwork. Measure the width of the work and mark the halfway mark of the frame with painters’ tape.
Framing and Matting
The style and finish of any framing will affect the way your work is understood by the audience. For example, an ornate gilt frame has different connotations than a simple square white frame. Be intentional in framing choices.
Standard size frames can be purchased at local stores such as Target, Walmart, and Michaels. However, options are limited to standard frame sizes or work must be custom matted.
Custom frames and mats can be purchased online from a variety of businesses.
Frames can be fabricated in a variety of materials with the support of staff and faculty in the Wood Shop. The process must start months in advance to accommodate training and fabrication.
Glass or plexiglass for frames can be cut inexpensively at hardware stores and offer savings compared to glass from custom frame shops. Always triple-check your measurements in advance and measure cut pieces before you pay for them to ensure they were cut to the correct dimensions.
Hanging Hardware
Types of Hardware

Push Pin | Thumbtacks | L Pin | T Pin | Picture Hanger | D Ring
* Please note that not all the equipment shown is available or in stock for use
Push Pins and Thumbtacks are often used for printed paper works. Use one color of push pins. Clear, gold, or silver push pins look professional. Try out different options in advance and make a choice in order to be prepared for installation.
L & T pins are common for hanging photo prints and generally look more professional than visible thumbtacks.
Picture hangers are often used in conjunction with wire or D rings (attached to the backs of frames or other solid works) and are great for hanging framed work.
Screws The Gallery has a large variety of screw types and sizes available and drills with screwdriver bits for installation. When installing or removing screws with a power drill, avoid letting the screwdriver bit spin without catching the grooves of the screw head. This will strip the screw head and make them difficult to remove from the wall. When in doubt, go slow.
*Any specialty hardware must be provided by exhibitor.
 Binder Clips are a common choice for hanging lightweight works and are typically used in conjunction with pins or small nails. Binder clips create a more informal setting. Be aware that the ventilation in the space may cause your work to blow up slightly at the bottom.
Adhesives can be destructive to gallery walls and usually require significant repair during the de-install process. Strong adhesives like Velcro and Command products often tear off drywall when they’re removed, requiring multiple coats of spackle and paint to make the walls smooth again. If you have explored other options and still feel the need to apply adhesives to the walls, you must speak with Gallery staff for approval to use adhesives.
Heavy Work
Underneath the drywall in the gallery is plywood and old wall material. It is generally unnecessary to look for wall studs, and the appropriate heavy-duty hardware or screws can easily accommodate most heavy work. When in doubt, consult with Gallery staff for hanging ideas and restrictions
See the diagram for one method of appropriately hanging heavy work; though the example is framed, this method could be useful for any piece with a flat back that can be screwed into.
Preparing Heavy Work for Hanging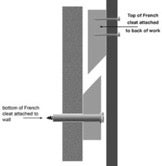
Attach hardware to the back of the artwork in the arrangement shown. This distributes the weight to the bottom of the frame, with tension pulled only from the sides. Always angle hangers on the frame and the wall to properly disperse the weight. Place at least two hangers in the wall to ensure the frame stays level.
French cleats are useful for hanging heavy works on the walls. These can be purchased at most hardware stores or can be fabricated in the Wood Shop.
Signage and Labels
There are a variety of ways to approach type and text within your exhibition. Students choose how much text is in their exhibition, how it is presented in relation to artwork, and how prominent it is as a component of the exhibition. It’s essential to provide some amount of text for context.
For example, large introductory text encourages the audience to interpret the text as key to engaging with the work. Small labels adjacent to each work contain titles and medium (called a “tombstone” label) and provide limited text to create meaning for the audience. Omitting text from walls and having a small zine as an accompanying guide will convey a different meaning and context. Museums try not to use less than 18pt type for wall-mounted exhibition materials to meet standards for visitors with visual impairments. Larger sizes are required for titles and vinyl.
Vinyl signage and labels are common for exhibitions in the School’s galleries.
Vinyl Signage
Vinyl signage and design elements can be cut in the Shape Lab on the vinyl cutter. The Gray Gallery provides stock vinyl for exhibitions in black, gray, dark blue, and dark green. Special vinyl colors must be provided by exhibitors. One color of vinyl will be used in group exhibitions. Depending on the exhibition space, exhibitors will work with gallery staff to choose the font and size for signage. Exhibitors choose the text. Be intentional when choosing fonts for text in your exhibition, as type will impact the way your work is understood. Limit fonts to one or two overall. When in doubt, keep things simple and legible.
Students are responsible for prepping (removing unneeded vinyl after the signage has been cut) and hanging the vinyl—in both the Gray and Burroughs Wellcome Galleries.
Labels
The School provides clear labels for exhibitions as well as 8 ½ X 11 clear sticky sheets for displaying artists’ statements (if desired).
It is customary for each piece to have its own label. Typically, the following information is provided on a label. Museum educators suggest that individual work labels have no more than 150 words and major exhibition intro texts do not exceed 200 words.
Artist Name
Artwork Name, (bold and italic). year of completion
Medium of artwork
Dimensions
Year and dimensions are not required but many people prefer to include this information.
Exhibition Label samples and additional information
Signage and Labels in the Gray Gallery
Vinyl signage will be provided for exhibitions in the Gray Gallery. In the Gray Gallery, staff will print labels and artist statements (if desired). Information is required two weeks prior to the opening of the exhibition to ensure signage and labels are ready for installation. Exhibitors will work with gallery staff to choose the font and size for signage
Signage and Labels in the Burroughs Wellcome Gallery
Exhibitors in the Burroughs Wellcome Gallery will work with Shape Lab staff to cut their own vinyl signage. Plan ahead so that you have enough time to cut and prepare vinyl signage for installation.
Students are responsible for hanging their own vinyl signage in the Burroughs Wellcome Gallery. Labels for work can be picked up from Gallery staff or Gallery staff can print labels if the information is provided two weeks in advance of installing the exhibition.
Artist’s Statement (optional)
Written in the first person, an artist’s statement is a piece of writing that helps the audience access and understand work. Writing about art doesn’t often come easily and may take a lot of revision to hone a concise and evocative statement. Artist’s statements in exhibitions are commonly 200 to 250 words. A common approach is to limit statements to three paragraphs—an introduction/thesis statement, detailed information, and a concluding paragraph focused on future goals/ideas or questions for the audience. Students should work with their faculty advisors to write, revise, and prepare their artist’s statement so that it is appropriate and meets the needs of the exhibition and is discipline appropriate.
Installation
Installing Vinyl Signage
Vinyl will come sandwiched between backing paper and transfer paper.
- Once you have determined where you would like your vinyl, use a level to ensure it is straight.
- Using painters’ tape, tape the top edge of the sandwiched vinyl to your surface. Check that it is level once again and re-adjust as necessary until it is level.
- Flip up the vinyl to expose the backing paper.
- Gently and slowly peel off the backing paper; do not allow the sticky back to touch your surface yet.
- When you have fully removed the backing paper, slowly adhere the back side to your surface, ensuring there are no air bubbles.
- Leaving the top layer of transfer tape on, rub thoroughly over the vinyl areas to ensure adhesion.
- Finally, gently and slowly peel back the transfer paper to reveal your vinyl.
- Vinyl can generally be only installed once and is very difficult to adjust once adhered, so be gentle and go slowly. Check out YouTube videos for visual guides on installing vinyl.
Artwork Hanging Height
It is generally recommended to hang work with the center point of the artwork at a height of 60” from the floor (average eye level).
See the diagram and instructions below for tutorials on how to find the right height for hanging hardware when installing a piece with picture wire attached at two points on the work (this example uses hanging wire but works for any install).
TIP: If you are hanging several pieces on center at eye level, we recommend temporarily marking (with painter’s tape or string) a sight line at 60” high along the walls. Once you find the center point in your artworks, it is easy to measure up or down from the center line to determine where to place hanging hardware.
Using Multiple Hooks
If a piece is heavy, or to help prevent the artwork from shifting off level, use more than one hook to hang it. All the measurements and formulas remain the same, but instead of placing one hook or screw on the wall, use two or more, separated by 4”-5”. Make sure they are levelUsing multiple hooks help distribute the weight. If the wire is on two hooks it becomes much more difficult for the painting to shift and become crooked due to vibrations or bumps.
How to calculate the location of hanging hardware
From RedDotBlog- How to Hang a Painting
Hanging Hardware Formula
½ picture height + ideal height [60 inches] – distance between frame and highest point on the picture wire = height of hanging hardware
Or:
- Measure the height of the painting and divide that number by two.
- Add that number to the ideal height (60”).
- Subtract the distance between the top of the artwork and the highest point of the picture wire.
- The resulting number is the height of your hanging hardware.
Example: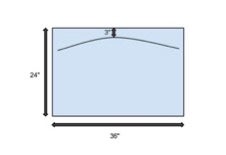
- Artwork measures 24” high x 36” wide.
- The wire is 3 inches from the top of the frame.
- To determine hanging hardware height, divide the height of the painting (24”) by two [24 inches / 2 = 12 inches] to get 12”.
- Add that number to ideal height, 60” [12 inches + 60 inches = 72 inches] to get 72”. This is where the top of the painting will be on the wall.
- Subtract the wire distance 3” from the overall heigh [72 inches – 3 inches = 69 inches] to get 69”, the height hanging hardware.
- Measure 69” from the floor, make a pencil mark on the wall, and install the hanging hardware.
Online Height Calculator
http://www.xanadugallery.com/Height-Calculator/
Additional Resources
Easy Gallery Wall Setup: https://www.youtube.com/watch?v=XxhcYDZ5H9U
Hang Artwork like a pro: https://www.youtube.com/watch?v=oczGKwczQqA
Extremely Tall Pieces
The formula works extremely well for artwork of any height up to 120”.
Measure from the bottom of the piece to the top of the hanging wire and add that number to 12” to get the height for the hanging hardware.
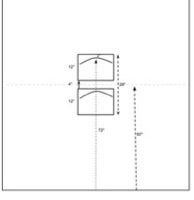
Hanging Groupings of work
Hanging grouping is no harder than hanging a single piece. Treat the grouping as a single piece. Any measurements will be taken from the overall grouping, not individual pieces. For smaller pieces, allow about 2 to 4 inches between pieces.
Carefully lay the artwork on a table or on the floor.
Measure the total height of the pieces, including the space between them.
Use the Hanging Hardware Formula (above). The resulting number is the height of the hook for the top piece.
After hanging the top piece, measure the distance between the wire and the top of the second piece. Add four to that number (the space between the top of the second piece and the bottom of the first piece).
Measure from the bottom of the first piece by that amount for the hanging hardware location for the second piece.
You may have to take the first piece off the wall once you have the height of the hook so that you can place the second hook directly below the first piece.
The mid-line should be in the middle of the grouping. If the pieces are different sizes, the middle height might not be directly between the pieces.
If the pieces are different sizes, decide whether you want the larger piece on top or underneath.
If you have more than two pieces, use the same Hanging Hardware Formula and technique of creating a grouping and using the grouping to make your measurement calculations.

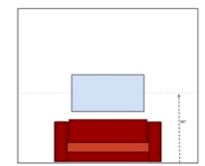
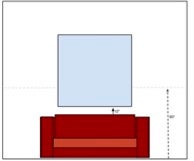
Hanging Work Above Furniture
Use the same Hanging Hardware Formula to hang above furniture.
If the furniture or artwork, is too tall, use the same approach as tall work. Measure from the bottom of the piece to the top of the hanging wire and add that number to the height you wish to hang the work above the furniture (8” to 12” is recommended). Use this measurement to identify the location of the hanging hardware, measuring from the top of the furniture.
LIGHTING
Lighting Tips
Keep shadows in mind when lighting an exhibition. Frequently step back to see that shadows are not disruptive to viewing. Keep in mind that multiple light sources will create multiple shadows, and placement/angling of lights may cause one to get in the path of another. Try to keep shadows as symmetrical and minimal as possible.
The layout of the lighting systems in the galleries has limitations. Some areas fall perpendicular to the tracks causing challenges getting even diffusion and brightness across a space. Depending on where fixtures can be placed on a track, three same-degree fixtures on the same track may not appear to have the same level of diffusion and brightness depending on their distance to the lighted area.
The distance between a fixture and the area you are lighting can affect and shift the light’s diffusion and brightness. The closer a fixture is to the desired area, the brighter and less diffused the edges of the lit area will be.
Lighting in the Gray Gallery
Lighting adjustments in Gray Gallery are done by ECU Facilities staff. Light fixtures are shared amongst students in a group exhibition. Students wishing to have different color bulbs must work with Gallery staff prior to lighting and provide their own bulbs.
Students should plan to be in the Gallery when Facilities staff is scheduled to light the exhibition. The date and time will be provided in advance at the planning meeting. Lighting an exhibition tends to take significant adjustment to determine what looks best. Students should plan to spend at least a couple hours in the Gallery during the lighting session.
All work must be installed before Facilities staff arrive to make lighting adjustments. Changes to lighting cannot be made after Facilities staff have left.
Lighting in the Burroughs Wellcome Gallery
Students adjust and light their own exhibitions. Light fixtures are shared amongst students in a group exhibition.
To attach lights to the tracks, line up fixture prongs with the track, then twist gently until the fixture clicks into place.
Deinstallation
Exhibitors use the Deinstallation Checklist (see below) to ensure that they meet community expectations for our galleries. Deinstallation is an important step in the exhibition process and should be done with care and attention to detail so that your exhibition does not impact students exhibiting after you in the gallery.
Repainting Walls
If you receive permission to paint walls, you are responsible for providing the paint and primer for both initial painting and returning the walls to their original condition. Dark paint colors require a minimum of two coats of gray primer, two coats of white primer, and finally, one or two coats of the gallery white paint. Painting intense colors requires a quality, high-coverage primer (such as Kilz or Bulls Eye 123) before the standard gallery white can be repainted.
Wall and Ceiling Repair
Exhibitors are responsible for spackling, sanding, and repainting walls. The walls must be returned to their original condition. In the Burroughs Wellcome Gallery this includes any hardware or holes in the ceiling.
The School provides kits that contains spackle, sanding blocks, paint, and putty knives. Kits can be obtained from Gallery or Main Office staff. Thoroughly clean tools before returning them to kit or storage location.
To spackle a hole in the wall:
- Wear gloves and a mask when repairing walls.
- Using a hard object (such as the head of a hammer), gently indent the hole and a small portion of the surrounding drywall. Remove any flaking paint or drywall surrounding the hole by scraping or sanding.
- Scoop a small amount (a little more than you think you need to fill the hole and indent) of spackle with a putty knife.
- Using the flat side of your putty knife, smoosh spackle into the hole.
- Using the edge of the putty knife, held perpendicular to the wall, scrape the excess spackle from the surface, making the surrounding wall and newly filled hole as level and smooth as possible by scraping the surface. Repeat this step if you see parts of the hole without spackle in it.
- Let the spackle dry completely. This will take 15 minutes to 1+ hours, depending on the size of the patch and the type of spackle.
- Wearing a mask, gently sand the patched area so that it is smooth to the touch and flush with the rest of the wall.
- If there are still indents visible, apply another coat of spackle and repeat the drying and sanding process.
- When the patched area is texturally invisible, paint over the area. Be mindful of visible brush strokes. Feather the edges of the repaired area into the rest of the wall. Two to three coats of paint are needed to return the wall to its original condition. Always use a drop cloth when painting. A roll of kraft paper is available in the Gray Gallery prep room for use as a drop cloth.
- Wall paint is egg-shell bright white.
Clean Up
Exhibition deinstall can generate mess and trash. You are expected to remove trash and debris. Cleaning must be completed on the day of your deinstallation unless other arrangements have been made with staff. Clean up includes returning all tools and hardware to the proper location, removing any trash in the gallery, returning pedestals to their storage locations, sweeping up dust from sanding and deinstall, and returning kits to Gallery staff. Housekeeping and School staff will not clean up after your deinstallation. The gallery should be clean and ready for the next exhibition when you are finished with deinstallation.
Exhibition De-install Checklist
Return the space to its original condition—ready to go for the next exhibition!
- Remove hanging hardware using the appropriate tool (e.g. screw driver or drill, hammer, etc.).
- Mark the locations where hardware was installed with a piece of painters’ tape. The tape will indicate where you need to patch and paint walls.
- After removing hanging hardware and vinyl use a wet Magic Eraser to remove pencil marks or residue from the wall, including any marks left by the artwork.
- Use putty knife to remove any remains of drywall sticking out from nail or screw holes.
- Patch holes from hanging hardware using the putty knife while wearing gloves (see instructions in the Handbook).
- Sand the walls to create an even, smooth wall surface. Wear a mask and gloves.
- Paint patched areas with two coats of wall paint using a small roller or brush if it is a small area. Paint any areas that the magic eraser is used on.
- For a decorated or painted wall:
- Minimum of one coat of gray primer (If paint is still visible after one coat, add another coat)
- One coat white primer
- Two coats of wall paint. Do not use the white wall paint until all streaks from color used on decorated are no longer visible.)
Always use a drop cloth when painting. A roll of kraft paper is available in the Gray Gallery prep room for use as a drop cloth. - Wall paint is egg-shell bright white.
- Cleanup pedestals with a wet magic eraser and repaint or touchup if necessary.
- Pedestal paint is semi-gloss bright white
- Return pedestals to Gray Gallery back hallway after they have been cleaned, painted, and dried
- Cleanup any tools used and return them to the appropriate cart or box.
- Clean the Gray Gallery sink area.
- Sweep the gallery, including the baseboards.
Sources
Hampshire College Art Gallery handbook, 2019 – 2020, 2nd Edition, Written & Compiled by, Ray Mendel, Gallery Alumni Fellow 2018-20 Charlotte Hawkins, Gallery Alumni Fellow, 2017-18, Amy Halliday, Gallery Director 2016-2019
https://sites.hampshire.edu/gallery/files/2019/09/gallery-handbook-2019-20-1.pdf
Purdue University Install Guidelines,
https://cla.purdue.edu/academic/rueffschool/rueffgalleries/Forms/index.html
Xanadu Art Gallery, Red Dot Blog
http://reddotblog.com/how-to-hang-a-painting-a-free-guide-from-xanadu-gallery/
Easy Gallery Wall Setup: https://www.youtube.com/watch?v=XxhcYDZ5H9U
Hang Artwork like a pro:https://www.youtube.com/watch?v=oczGKwczQqA